Craving a fast, healthy snack that fits your busy lifestyle? The Ice-Cold Gelatin Master Guide is your ultimate kitchen shortcut. This premium digital guide reveals the exact science and step-by-step technique to create a firm, velvety, low-sugar gelatin snack in under an hour—saving you hours of fridge time. Perfect for busy wellness enthusiasts, it delivers an 8g pure protein boost per serving with zero sugar or carbs. Discover how to customize flavors with herbal infusions or keto-friendly options. Say goodbye to rubbery clumps and hello to guilt-free satiety. Download your copy today and master the art of the rapid-set!
Description
In the modern culinary landscape, the intersection of rapid kitchen hacks and traditional food science frequently sparks viral curiosity. From social media feeds to culinary forums, home cooks and wellness enthusiasts alike are focusing on a minimalist preparation technique known colloquially as the Ice Gelatin Trick.
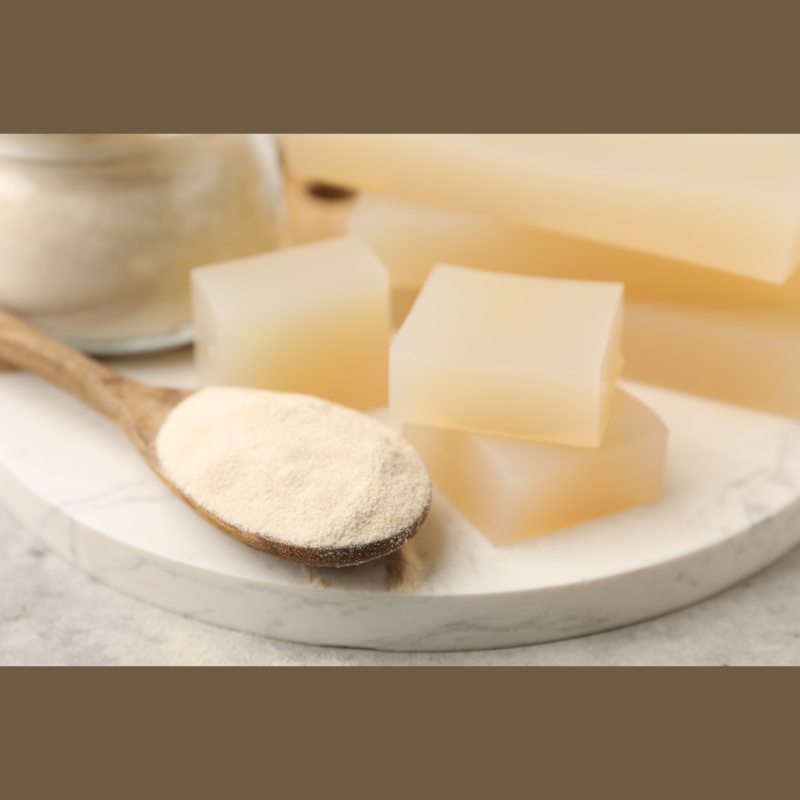
At its core, this method is a reimagining of standard gelatin preparation. Instead of relying on the conventional hours-long refrigeration cycle to set a gelatin matrix, this approach uses a precise, rapid-cooling technique powered by ice. The result is a distinct, velvety yet firm structure achieved in a fraction of standard setting times.
Far from being a mere internet novelty, the ice-cold gelatin method offers an accessible entry point into the mechanics of hydrocolloids. This article explores the science behind rapid thermal reduction, provides an exhaustive step-by-step master recipe, highlights critical structural mistakes to avoid, and provides diverse flavor variations for every dietary preference.
Part I: The Culinary Science of Gelatin and Rapid Thermal Reduction
To understand why the ice-cold gelatin method works, one must move past the viral recipes and look at structural biochemistry. Gelatin is not a synthetic compound; it is an animal-derived hydrocolloid produced by the partial hydrolysis of collagen, the primary structural protein found in connective tissues, skin, and bones.
The Molecular Lifecycle of Gelatin
In its dry, packaged state, gelatin consists of dehydrated, broken protein chains coiled tightly like tiny, disordered springs. Transforming these dormant proteins into a cohesive, sliceable gel requires a precise three-stage thermal journey:
- Hydration (The Bloom): When unflavored gelatin powder is introduced to cool or warm water, it behaves like a microscopic sponge. The protein fragments absorb water molecules, swelling to several times their original size. This stage relaxes the tightly coiled chains, preparing them for thermal dissolution.
- Thermal Dissolution: Introducing gentle heat breaks the weak hydrogen bonds holding the coiled protein fragments together. The chains uncoil completely and disperse uniformly throughout the liquid, creating a hot, fluid solution known colloquially as a sol.
- The Gelation Matrix (Thermal Reduction): As the temperature of the sol drops, the kinetic energy within the liquid decreases. The elongated protein chains slow down and begin to cross-link with one another, trapping water molecules within a three-dimensional network. This network transforms the liquid sol into a solid, viscoelastic gel.
Slow Cooling vs. Rapid Ice Shocking
In traditional culinary applications, a dissolved gelatin solution is placed directly into a refrigerator, dropping its temperature gradually over three to four hours. This slow thermal decline allows the protein strands to systematically align themselves into highly organized, triple-helix structures.
The ice-cold method disrupts this slow alignment. By introducing ice cubes or ice-cold water directly into the warm, dissolved gelatin sol, you execute a process akin to thermal shocking.
The sudden drop in temperature forces the uncoiled protein strands to link up rapidly. Because they lack the time to form long, perfectly organized triple helices, they snap into a dense, intricate network of shorter, highly concentrated bonds.
This structural difference changes the final texture. Slow-cooled gelatin yields a delicate, jiggly melt-in-the-mouth consistency. Rapidly ice-shocked gelatin yields a tighter, slightly firmer structure with a distinct cleanly snappable bite—all accomplished in roughly 30 to 60 minutes instead of half a afternoon.
Part II: Master Ingredient Profiling and Kitchen Tool Kit
Achieving a flawless rapid set depends entirely on precision. Because this recipe uses a minimal ingredient profile, the quality of your components and the accuracy of your kitchen tools directly dictate the structural integrity of the final gel.
Ingredient Analysis
- Unflavored Gelatin Powder: The foundational structural element. For standard culinary consistency, look for premium, unflavored gelatin powder with a Bloom rating (a measure of gel strength) between 225 and 250. Grass-fed bovine gelatin or high-quality porcine gelatin work equally well. Avoid pre-sweetened, artificially colored dessert boxes, as the added sugars and citric acids alter the hydration dynamics.
- The Fluid Medium (Water): Water serves as the solvent that fills the spaces within the protein matrix. The water must be divided into two distinct temperatures: a warm, non-boiling portion ($110^\circ\text{F}$ to $130^\circ\text{F}$) to dissolve the hydrated crystals, and an ice-cold portion to shock the solution.
- The Ice Element: Clean, clear ice cubes made from filtered water are ideal. The ice must be measured accurately because as it melts into the warm sol, it becomes part of the final liquid-to-gelatin ratio.
- Optional Structural Modifiers: A brief squeeze of fresh lemon juice or a pinch of mineral salt can be added. The acid in citrus brightens the flavor, while the minerals in salt subtly support the cross-linking process.
Required Kitchen Hardware
To ensure your ice-cold gelatin sets perfectly every time, you will need a few simple but precise kitchen tools. Each piece of hardware plays a specific role in managing the temperature and texture of the mixture:
Digital Kitchen Scale: This is your most important tool. It completely eliminates the guesswork and inaccuracy of volumetric measuring spoons, ensuring a perfect liquid-to-solid ratio for a flawless set.
Wide-Bottomed Glass Bowl: A bowl with a wide base provides the maximum surface area possible for the blooming stage. This allows the powder to hydrate evenly and prevents dry, unhydrated pockets from forming.
Fine-Mesh Stainless Steel Whisk: This tool is essential for introducing gentle mixing energy. It helps dissolve the gelatin smoothly without whipping unwanted excess air bubbles into your liquid sol.
Infrared or Digital Stem Thermometer: Precision temperature management is key to this method. A reliable thermometer allows you to monitor the liquid so it stays warm enough to dissolve the crystals completely, but not hot enough to degrade the structural proteins.
Shallow Glass or Ceramic Setting Dish: Shallow dishes conduct and transfer thermal energy much more efficiently than deep containers. This helps your ice-shocked mixture chill and set uniformly once it hits the refrigerator.
Part III: The Master Step-by-Step Ice-Cold Gelatin Recipe
This master blueprint yields a clean, firm, low-sugar set using the rapid-cooling method.
Recipe Specifications
- Prep Time: 5 minutes
- Blooming Time: 5 minutes
- Active Mixing Time: 5 minutes
- Setting Time: 30–40 minutes
- Total Protocol Duration: Under 1 hour
- Yield: 2 substantial servings
Precise Formulations (Grams vs. Volumetric)
- Unflavored Gelatin Powder:$10\text{ grams}$ (~1 tablespoon)
- Initial Hydration Liquid (Warm Water):$60\text{ grams}$ (~1/4 cup) at $120^\circ\text{F}$
- Thermal Shock Liquid (Ice + Chilled Water Combined):$180\text{ grams}$ (~3/4 cup)
Step-by-Step Instructions
Step 1: The Precision Bloom
Pour exactly $60\text{ grams}$ of warm water ($120^\circ\text{F}$) into your wide-bottomed glass bowl. Holding your scale-measured gelatin powder high above the bowl, sprinkle it slowly and evenly across the surface of the water.
Important: Do not dump the powder in a singular mound; this creates a hydrophobic outer shell that prevents water from reaching the dry core. Leave the mixture completely undisturbed for 5 minutes. The crystals will expand and turn translucent, signaling a successful bloom.
Step 2: The Thermal Dissolution
Using your fine-mesh whisk, stir the bloomed gelatin gently using a circular motion. Keep the whisk close to the bottom of the bowl to avoid creating foam or air pockets. Within 60 to 90 seconds, the ambient heat of the water will dissolve the hydrated crystals completely, yielding a perfectly clear, honey-like liquid sol free of graininess.
Step 3: The Ice-Shock Manipulation
Prepare your $180\text{ grams}$ of combined ice cubes and chilled water. Introduce the ice cubes to the clear, warm sol one by one while continuously whispering the liquid with your whisk.
As the ice melts, it rapidly pulls thermal energy out of the gelatin molecules. Watch the consistency of the liquid closely: it will quickly transform from a thin fluid to a slightly viscous, heavy-bodied state. Once the liquid temperature plummets and it begins to cling to the sides of the bowl, immediately fish out any small, remaining unmelted ice slivers to prevent over-diluting the recipe.
Step 4: The Accelerated Structural Set
Pour the chilled, thickened mixture into your shallow glass setting dish. Slide the dish onto the coldest shelf of your refrigerator (typically the top shelf near the cooling vents). Leave it completely undisturbed for 30 to 40 minutes.
Step 5: Verification and Service
To test the set, lightly touch the center of the gel with the pad of a clean finger. It should offer firm, elastic resistance and pull away without leaving any sticky residue. Slice into neat squares and lift with a offset spatula.
Part IV: Troubleshooting Common Structural Deficiencies
Even though this method uses minimal ingredients, it requires precise technique. If your cold-set gel fails to match your expectations, it is usually due to a breakdown in molecular assembly. Here is how to diagnose and correct those structural flaws.
1. The Rubbery, Over-Concentrated Matrix
- The Symptom: The gel is dense, tough, and difficult to cut, with a chewy, unappealing texture.
- The Root Cause: This occurs when the gelatin-to-liquid ratio is skewed too high, often by allowing too much ice to melt or failing to measure the powder accurately on a digital scale.
- The Correction: Melt the failed gel down completely in a double boiler over gentle heat. Add an extra 20 to 30 grams of warm, filtered water to balance the ratio, stir thoroughly, re-shock with a tiny piece of ice, and set it back in the refrigerator.
2. The Grainy, Non-Homogeneous Gel
- The Symptom: The final gel contains hard, sand-like particles of undissolved gelatin embedded within a weak fluid matrix.
- The Root Cause: This is a classic blooming failure. Dumping the powder into a single clump creates a dry, sealed center that cannot absorb water. Alternatively, the water may have been too cold to dissolve the crystals completely during mixing.
- The Correction: Avoid rushing the bloom stage. Always sprinkle the powder slowly over the water, like a gentle dusting of snow. If graininess persists, warm the mixture gently over a hot water bath until all visible particles disappear before attempting the rapid ice chill.
3. The Soupy, Incomplete Set
- The Symptom: After 45 minutes in the refrigerator, the mixture remains a fluid or semi-liquid sludge that refuses to hold its shape.
- The Root Cause: The water used during the dissolution phase was likely boiling (above $212^\circ\text{F}$), which permanently fractures the long protein chains into short fragments that can no longer cross-link. This issue can also occur if you use fresh fruits containing proteolytically active enzymes.
- The Correction: Never use boiling water; keep temperatures below $140^\circ\text{F}$ to preserve the structural proteins. If you are adding fresh fruits like pineapple, kiwi, or papaya, boil them thoroughly first to denature their enzymes before adding them to your gelatin mixture.
Part V: Flavor Architectures and Creative Infusions
Once you master the foundational technique, you can use unflavored gelatin as a clean slate for custom flavor profiles. Because unflavored gelatin has no sugar or artificial additives, you can adapt it to fit any dietary framework or flavor preference.
Natural Botanical and Herbal Infusions
Elevate the basic recipe by replacing the water with home-brewed botanical teas.
- The Ruby Hibiscus Burst: Steep two organic hibiscus tea bags and a crushed sprig of fresh mint in water to create a vibrant red base. Allow the brewed tea to cool down to $120^\circ\text{F}$ before using it to bloom and dissolve your gelatin. Proceed with the ice-shocking protocol. The natural tartness of the hibiscus creates a crisp flavor that pairs beautifully with a touch of raw honey.
- Chilled Chamomile Lavender: Steep high-quality chamomile flowers and culinary lavender blooms together, strain carefully, and use the liquid as your recipe base. This profile creates a soothing snack that fits nicely into a relaxing evening routine.
Low-Glycemic and Keto-Friendly Formulations
For those minimizing refined sugars, this cold-setting technique works perfectly with modern natural sugar alternatives.
- The Citrus Monk Fruit Splash: During the warm dissolution phase, stir in 2 grams of pure monk fruit extract or erythritol along with 10 grams of freshly squeezed lime juice. Shock the mixture with ice cubes made from filtered water infused with lime zest. This creates a tart, low-calorie treat that keeps your sugar intake at zero.
- Matcha Green Tea Fusion: Whisk 3 grams of ceremonial-grade matcha powder directly into the warm water before blooming your gelatin. The natural L-theanine and clean green tea flavor notes combine with the firm texture to make an excellent afternoon pick-me-up.
High-Density Protein and Collagen Fortifications
If you want to use this method to support macro-nutrient goals, you can enhance its protein profile without ruining the delicate structure.
- The Clear Isolate Infusion: After dissolving your gelatin completely in warm water, gently fold in half a scoop of unflavored whey protein isolate or clear hydrolyzed beef collagen peptides.
- The Balancing Act: Hydrolyzed collagen peptides are broken down too much to set on their own, so they will not gel if used by themselves. However, by combining them with structural unflavored gelatin powder, you can significantly boost the overall protein density while ensuring the recipe still sets into a firm, satisfying snack.
Part VI: Comparative Hydrocolloid Matrix Analysis
To appreciate why gelatin behaves the way it does under rapid cooling conditions, it helps to compare it with other popular gelling agents and thickeners used in modern cooking.
Gelatin vs. Agar-Agar
Agar-agar is a plant-based hydrocolloid extracted from red algae, making it a popular choice for vegetarian and vegan cooking. However, its molecular structure behaves very differently from animal-derived gelatin:
- Thermal Settings: Gelatin is highly sensitive to cold and requires thermal reduction or ice-shocking to set. Agar-agar, by contrast, dissolves only in boiling liquid ($185^\circ\text{F}$ to $212^\circ\text{F}$) and sets firmly at room temperature as it drops below $100^\circ\text{F}$.
- Texture Profile: Gelatin creates an elastic, melt-in-your-mouth texture because its melting point matches human body temperature (~$95^\circ\text{F}$). Agar-agar creates a brittle, firm, and crumbly gel that does not melt in the mouth, meaning it will not respond correctly to the rapid ice-shocking technique used here.
Gelatin vs. Hydrolyzed Collagen Peptides
While both products come from the same raw material, their molecular weights alter how they behave in the kitchen:
- Gelatin: Contains long, high-molecular-weight protein chains that easily interlock to trap liquids and form a solid gel.
- Hydrolyzed Collagen: Has undergone intense enzymatic processing to break those long proteins down into tiny, low-molecular-weight peptides. These fragments are too short to hold onto water molecules or form a structural matrix. As a result, collagen powder dissolves completely into hot or cold liquids without ever thickening them, making it useless if you are trying to make a firm, set snack.
Part VII: Nutritional Synthesis and Dietary Integration
Understanding the nutritional profile of unflavored gelatin helps you integrate this cold-setting technique into your daily meals with clarity and purpose.
Macronutrient Breakdown
Plain, unflavored gelatin is an exceptionally pure source of protein, completely free of carbohydrates, fats, and sugars. A standard single-tablespoon serving ($10\text{ grams}$) delivers:
- Calories: ~35–40 kcal
- Total Carbohydrates:$0\text{ grams}$
- Total Dietary Fiber:$0\text{ grams}$
- Total Sugars:$0\text{ grams}$
- Total Fat:$0\text{ grams}$
- Pure Protein:$\sim 8.5\text{ grams}$
- Sodium:$\sim 10\text{ mg}$
The Amino Acid Profile
Because it is derived from collagen, gelatin has a unique amino acid footprint that differs significantly from standard protein sources like whey, beef, or soy. It is exceptionally high in three specific amino acids:
- Glycine: Makes up nearly one-third of gelatin’s total amino acid content. Glycine plays an important structural role throughout the body and is a foundational building block for glutathione, one of the body's primary endogenous antioxidants.
- Proline and Hydroxyproline: These amino acids account for roughly 25% of gelatin's structure. They are essential components for maintaining the structural integrity of your body's internal connective tissues.
- The Limiting Factor: Gelatin is not a complete protein because it lacks tryptophan, one of the essential amino acids. While it is a fantastic structural tool and a helpful way to round out your daily protein intake, it should be enjoyed alongside a varied diet that includes complete protein sources.
Satiety and Mindful Portion Management
One of the main reasons home cooks enjoy including this rapid-set recipe in their routines is its unique effect on satiety. When you consume a firm, ice-set gel, the protein matrix occupies substantial physical volume in the stomach.
Because it takes time for your digestive enzymes to break down the dense network of protein bonds, the gel breaks down gradually. This steady digestion helps you feel full and satisfied between meals.
Furthermore, because you can control the sweetness using natural options like stevia, monk fruit, or citrus juices, this method provides a satisfying, structured snack that satisfies the desire for something sweet without causing a sharp spike in blood sugar.
Part VIII: Safety Frameworks, Caveats, and Ethical Sourcing
As with any trending kitchen approach, it is important to cut through the online noise and focus on smart, practical safety guidelines.
Sourcing High-Quality Raw Materials
The quality of your final gel depends entirely on the quality of your ingredients. When buying unflavored gelatin, look for brands that prioritize transparency and clean sourcing:
- Traceability: Look for certified pasture-raised, grass-fed bovine options or trusted porcine sources with clear manufacturing standards.
- Purity: Ensure the ingredient list contains exactly one item: pure gelatin. Avoid any options with added anti-caking agents, synthetic flow powders, or hidden sugars.
Dietary and Lifestyle Exclusions
Because gelatin is an animal-byproduct sourced from cattle or pigs, it does not fit into vegetarian, vegan, or raw plant-based lifestyles.
- Cultural Certifications: For cooks who follow Kosher or Halal dietary practices, standard store-bought gelatin is often unsuitable. Be sure to look for products that carry explicit, verified Halal or Kosher certifications on the packaging to ensure the raw materials match your personal values and traditions.
Digestive Sensitivity and Gradual Adaptation
While pure gelatin is generally mild and easy on the stomach, introducing any concentrated protein routine to your body should be handled thoughtfully:
- Listen to Your Body: If your current diet contains very little animal protein, jumping into large daily portions of structured gelatin can occasionally cause mild temporary changes in digestion or a feeling of fullness as your stomach adjusts.
- The Best Approach: Start small. Prepare a half-portion of the master recipe first, see how your body responds over 48 hours, and increase the amount gradually as your system adapts. If you have specific medical conditions, food allergies, or unique dietary restrictions, it is always smart to check in with a healthcare professional or registered dietitian before making new recipes a permanent part of your daily routine.
Part IX: Culinary Epilogue and Perspective
The ice-cold gelatin method is a perfect example of how a simple shift in temperature can change how we prepare everyday ingredients. By stepping away from standard box mixes and understanding the science of rapid thermal cooling, you can turn a basic pantry staple into a versatile, high-protein culinary tool.